10 Things You Didn't Know Your RØDECaster Pro Could Do
The RØDECaster Pro has evolved many times since its release in 2018, with firmware updates introducing a host of handy features that make it even easier to create incredible sounding podcasts. With so many features available, it can be hard to keep track of what they are and whay they do.
Below we're going to showcase some of the unsung heroes. Here are 10 things you didn’t know your RØDECaster Pro could do.
To learn more about the RØDECaster Pro, check out the RØDECaster Pro Learning Hub.

1. Producer Mode
Sometimes when recording a podcast, you’ll need to prep a guest before bringing them into the live feed. This usually involves a conversation that plans the entry of the guest into your show, which is important but not particularly interesting for your listeners.
For this reason, the RØDECaster Pro has a ‘Producer Mode’. This can be activated by pressing the solo and mute buttons for the host channel and any other channel that you want to prep, including the smartphone, Bluetooth and USB channels. The icons for each channel included in 'Producer Mode' will turn yellow on the touchscreen.
You can then turn up the faders for each channel participating in the 'Producer Mode' conversation, allowing each of the guests on these channels to communicate without the audio being recorded.
2. Ducking
Podcasting is often a chaotic and busy form of media, with lots of different guests and sounds weaving in and out of a single episode. Sometimes it’s necessary for the host to cut through the hubbub, and this is where ‘ducking’ is super handy.
Ducking is a type of processor that effectively reduces the volume of one sound signal whenever another sound signal occurs. When activated on the RØDECaster Pro, ducking will temporarily reduce the volume of all the channels whenever the 'host' speaks on Channel 1. This means the host will always be heard clearly above the rest of the podcast, no matter how busy it gets.
To activate ducking, simply go to: 'Settings' > 'Advanced' > 'Audio' > 'Processing' and press 'Ducking'.
3. USB Mix-Minus
Have you ever been in a Zoom meeting and you or the other people on the call can hear an echo of their voice? This can be very distracting, and not something you want to be audible in your podcast if you are recording remote callers via USB.
Thankfully this can be mitigated very easily with the RØDECaster Pro using a feature called 'USB mix-minus'. When activated while using the USB channel to bring in a remote caller, the RØDECaster Pro will cancel out the returning audio to your comms app, resulting in crystal-clear, echo-free communication between you and your guest(s).
To actiavte USB mix-minus, simply go to: 'Settings' > 'Advanced' > 'Audio' > 'Processing' and press 'USB Mix-Minus'.
The other communications channels on the RØDECaster Pro (Bluetooth and smartphone) automatically apply mix-minus to the signal, so you don't have to worry about switching this on to ensure echo-free calls.

4. Broadcast Meters
The default level meters on the RØDECaster Pro home screen have been designed to be very easy to interpret, but for those who want more detailed information from them, 'Broadcast Meters Mode' can be used. When activated, all meters on the home screen will be displayed with full dBFS markers; very handy when you need to precisely gauge at what level a channel is peaking.
To switch on 'Broadcast Meters Mode', simply go to: 'Settings' > 'Advanced' > 'Audio' > 'Operations' and press 'Broadcast Meters'.
5. Save/Load Shows
RØDECaster Pros are used in all sorts of environments, including podcast studios, teaching facilities and production houses. This can often mean the same RØDECaster Pro is used by multiple people to create entirely different podcasts.
This is why we introduced a feature that allows you to save a snapshot of all your settings, which can be saved and reloaded at any time in the future.
This feature is only accessible from within the Companion App while your RØDECaster Pro is connected. To save or load a 'show', simply go to 'File' > 'Save Show' to save a preset, or 'Load Show' to load your pre-saved settings onto your RØDECaster Pro.
6. Sound Pad 'Record' and 'Overdub'
Loading sounds onto the RØDECaster Pro is as easy as dragging and dropping audio from your computer into the Companion App, but what about creating custom sounds on the RØDECaster Pro itself?
There are two different ways to do this. First, you can simply record over the audio on any sound pad by entering the sound pads menu, selecting the pad you way to replace, tapping 'Record', then tapping the red record button. Now any audio running through the RØDECaster Pro will be recorded onto that sound pad, whether that's your voice on one of the microphone channels, or music from the USB channel.
There's another handy tool for creating even more interesting custom sounds – 'Overdub Mode'. When activated, the audio you record onto the sound pad will be layered on top of the existing audio, allowing you to create multi-layered audio for intro and outro music, jingles or ad rolls.
To switch this on, simply tap 'Overdub' while in 'Record Mode'.
7. Quick Menu Navigation
Often while setting up your RØDECaster Pro, you’ll be diving in and out of menus and tweaking a variety of different settings, which can slow down the set-up process. By swiping the touchscreen from the bottom to the top, you can quickly access the home screen. The same works vice versa: swiping from top to bottom will take you back into the menu screen you were previously viewing. This can be particularly handy when switching back and forth from the home screen to check audio levels while setting up.
8. Headphone Boost
Podcasters use many different types of headphones, ranging from earbuds to high impedance studio headphones, some of which will require more volume to reach a suitable level for monitoring. If you notice that you need to push your headphone output up quite a bit while podcasting, try using the headphone boost function.
To activate this, head to ‘Settings’ > ‘Advanced’ > ‘Headphones’ and tapping on ‘Boost Headphone Volume’.
Before you do, remember to turn down all of the headphone volume knobs then gradually turn them up until you achieve a decent level to avoid damaging you or your guests' ears (note that the headphone boost affects all headphone outputs).
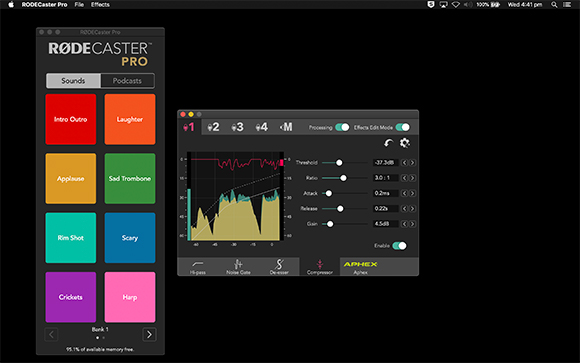
9. Effects Edit Mode via the Companion App
Did you know that you can access the RØDECaster Pro's advanced effects and processors from the Companion App as well as the unit itself?
Simply connect your RØDECaster Pro to a computer, open the Companion App, go to 'File' > 'Open Effects Editor' and switch on 'Effects Edit Mode'. Aside from the usual settings that can be found in the RØDECaster Pro, the Companion App offers some extra controls:
- The compressors come equipped with visual graphs to show effects over time
- An extra ‘Set to Default’ function.
- Arrows that allow for precise parameter changes.
10. The Master Compressor
If you’ve ever listened to a top podcast, you may have noticed that it has a smooth and consistent quality that gives it a professional edge. This is often the work of a compressor being applied to all of the channels of the podcast, which helps glue all of the audio together.
Each channel on the RØDECaster Pro has its own individual compressor, but there is also a master compressor, which is the last processor in the signal chain before your audio goes to the output.
Enabling the master compressor will require 'Effects Edit Mode' to be switched on ('Settings' > 'Advanced' > 'Audio' > 'Processing'). Once activated, go to ‘Settings’ > ‘Channels’ and select ‘Master Compressor’.
This should be a very subtle effect. When used correctly, it will glue all the elements of your podcast together and give it a balanced, even sound.
If you want to learn how to use any of the features or settings from this list, check out the RØDECaster Pro Learning Hub. Packed with images, videos, walkthroughs and in-depth explainers, the Learning Hub has all the info you need to master your RØDECaster Pro!